Is FaaS truly Serverless?

Introduction

Since the advent of cloud computing, most enterprises have primarily relied on the Infrastructure as a Service (IaaS) model for building and deploying their web applications. IaaS can be leveraged in one of the following three ways:

  • A Public cloud (think AWS EC2, Google Cloud Compute Engine, etc.).
  • A private (corporate) cloud.
  • A hybrid cloud (an amalgamation of the above two).

IaaS has been essential in introducing countless organizations to the benefits of the cloud. However, since quite some time, Serverless is being touted as the next logical step for cloud computing. Although the reasons for this are multitude, the major reason (similar to most other business decisions) is the same – money. (Of course, there are several other factors as well, but that would be another blog in itself.)

Detour: What is Serverless?

In the IaaS world, you own a bunch of servers and you deploy your applications to the same. You pay good money for these servers – hourly, monthly, or whatever billing plan you choose. But do you fully utilize their compute power at all times? Of course not! Though you can employ various auto-scaling strategies, many of your resources will still go to waste. You end up paying for idle as well. Unless of course you can predict the exact traffic trend, which, unfortunately is not true of most applications.

This is where Serverless shines the most, you only pay for what you use. For e.g., if you were to run a piece of code on AWS Lambda (a form of Serverless offering from AWS), and if your code were to run for, let’s say 100 ms, you would end up paying to AWS only for these 100 ms worth of resources! This is what drives down the price by a major factor.

To understand the premise behind this blog, let’s take a look at some of the goodness Serverless tries to offer:

  1. Pay-as-you-go: This one should be obvious due to the inherent nature of Serverless.
  2. Managed servers: You are only bothered with writing your functions’ code and registering the same with your cloud provider. There is no overhead of maintaining any servers.
  3. Faster time-to-market: Again, since you do not need to deploy any fully-featured web application, your time-to-market goes down significantly. This is especially beneficial for up-and-coming startups.
  4. Effortless scaling: Serverless does not require you to worry about scale while writing your application. It, inherently, scales up and down as per demand. And it is the responsibility of the cloud provider to ensure the same.

What is Function as a Service?

Function as a Service (FaaS) is a form of Serverless offering being provided by various cloud providers. A few examples:

As was described in the AWS Lambda example in the previous section, FaaS is essentially a pay-as-you-go model. It is an event-triggered paradigm. Simply put, in response to certain events, the cloud provider runs your function.

Some points/thoughts:

  1. Do not assume that Serveless only means FaaS. Since FaaS is the most prominent form of Serverless, it is easy to make this assumption.
  2. On the face of it, FaaS might look similar to PaaS. If you feel the same, try researching a bit more. I am keeping this out of the scope of this blog.

How FaaS scales?

In the FaaS world, you only write functions and do not worry about horizontal scaling. When the cloud provider receives an event to trigger a function, it spins up a container (not to be confused with a containerization technology such as Docker) and runs your function. This is an ephemeral container and may last either for only one invocation or for up to a few minutes (depending on the cloud vendor and various other conditions). When another function trigger is received in parallel to an already executing function, a new container will be spun up. This is how scaling works for FaaS.

Cold start problem with FaaS

A warm start is when an existing function is used to serve a request. Cold start is when no function is available/free to serve a request, and a new function needs to be spun up for the same. However, spinning up a new function introduces latency in the its execution. This latency can be broken down into two parts:

  1. Time to spin up the container: Serverless does not mean no servers will be involved. At the end of it all, every bit of code needs a physical machine to run on. It is just that these servers/containers (where your code runs) will be managed by the cloud vendor. The time spent in booting up these vendor containers is out of your control.
  2. Setting up the runtime: This part of the cold start can be controlled by the developer using various factors such as the choice of language being used for writing the function, the amount/size of dependencies being used by your code, etc. For e.g., a function written in Java would have a longer cold start time compared to one written in Python.

cold start

Typically cold start is not a major problem if you functions remains “warm” enough. However, sudden traffic spikes, augmented with one cold function calling another cold function, can lead to disastrous cascading scenarios.

Keep your functions warm

There are various methods (read “hacks”) to keep your functions warm such as:

  • Warming up your functions before expected spikes.
  • Warming up your functions at regular intervals.

AWS recently introduced something called “Provisioned Concurrency” for their FaaS offering (AWS Lambda). Using this feature, you can avoid the problem of cold start by keeping aside a fixed number of functions in an always running state. This number of always up functions need not be fixed either. You can keep changing its value throughout the day depending on expected spike patterns. For e.g., a food delivery application might expect a spike around evening for dinner orders. The Provisioned Concurrency can be set to a higher value around that time. All requests will first be served by these provisioned functions. If your demand exceeds the supply, new on-demand functions will be created in the usual way (along with the associated cold start).

Also, note that for these always available functions, you do not pay-as-you-go. You pay the regular IaaS way.

So, is FaaS truly Serverless?

Yes, for some cases and no for others. Serverless is supposed to be a managed, auto-scalable, on-demand offering. With recent trends such as Provisioned Concurrency, it is breaking away from its “managed” and “pay-as-you-go” philosophies.

For use-cases which will not be bothered by the cold start problem, FaaS seems to be truly Serverless. Examples include data processing functions, asynchronous non-real time calculations, etc.

However, if one tries to create a mission critical application or a real-time API, using workarounds such as Provisioned Concurrency, the true Serverless definition takes a hit. The main hit is taken by the “pay-as-you-go” philosophy wherein the dedicated functions begin to morph our Serverless system into somewhat of a dedicated EC2/GCE cluster.

Epilogue

FaaS is not a one-size-fits-all solution. Using this, we can target certain classes of problems in a very cost effective manner. Think of a video sharing application which runs post processing after users submit their videos. You do not need to have always available dedicated clusters for the same. New functions can be spun up when needed.

However, there will be other categories of problems for which FaaS might not be an ideal solution. For e.g., many people will be hesitant to use cloud functions (in conjunction with an API gateway) to build online, low-latency, user-centric APIs. Another point to not is that functions, unlike dedicated VMs, cannot maintain a dedicated HTTP connection pool or a DB connection pool.

These are still early days for Serverless/FaaS and a lot of problems in areas such as tooling, observability, etc. need to be tackled. This is an exciting and a promising space. Let’s see how it evolves in the future. Until next time!

Preferences in Android

Android provides a bunch of, at times, confusing APIs for accessing shared preferences. Let’s discuss the same here. For reference, we will be using the image below. The image is taken using Android Device Manager and shows three preferences file used by our sample application.

Three preferences files

1. Context.getSharedPreferences(String name, int mode)

Creates a preference file of a given name.

Example: If we supply the name as “utilsPrefsFile”, it will create a preference file called utilsPrefsFile.xml (image above).

Note: The same file can be accessed from any activity within the application.

2. PreferenceManager.getDefaultSharedPreferences(Context ctxt)

This opens a preference file named “_preferences”. Internally, this method calls Context.getSharedPreferences(…).

Example: If the package name is “com.rudra.attendanceRegister”, a preferences file called com.rudra.attendanceRegister_preferences.xml would be created (image above).

Note: The same file can be accessed from any activity within the application.

3. Activity.getPreferences(int mode)

This opens a preference file specific to a particular activity. Android does so by removing the package name prefix form the Activity class’s fully qualified name. Internally, this method calls Context.getSharedPreferences(…).

Example: If the package name is “com.rudra.attendanceRegister” and the Activity’s name is “com.rudra.attendanceRegister.activities.MainActivity”, a preferences file called activities.MainActivity.xml would be created (image above).

Bonus

It is not too difficult to figure the about out. Just go through the source to see for yourself!

HTTPS Certificates and Passphrase

HTTPS, as you must know uses certificates. And certificates involve a public-private key pair. The private key is what resides at the server side. In most cases, the private key is protected by another layer. This layer involves accessing the private key with the use of a passphrase. The passphrase is used to decrypt the private key.

In short, without this passphrase, you will not be able to verify HTTPS communication, even if you have access to the private key. Lets see how to verify if you have the correct passphrase in an example below!

Step 1 – Generating a private RSA key

First, we generate a private RSA key using the below command.

openssl genrsa -des3 -out mykey.pem

This will generate a new key into the file called mykey.pem. You will be prompted for the passphrase when running this command. By default, the key will be 512 bits long. Each time it will generate a new random key. Below is the key that got generated for me.

-----BEGIN RSA PRIVATE KEY-----
Proc-Type: 4,ENCRYPTED
DEK-Info: DES-EDE3-CBC,7EA46E1BF4BDF099

k7JJm7/wLh9dJtMYWdwUAO+Khg3DdlSgX0jU45cuy7r1BDj4p1IoXTeV0d7sz5V9
xY/8VRHIBVUEg7yt+7ygibfiLcwntpRf5Or98hEHb6Ak9D5GxMQJuqLXrsKJpl/z
KtOKyz4cv8FZQOXhUnhROb0+DO6qSc+RhB6fL+Ekuu3hmTtG0tKrJtkvbWRUKRXz
fPZeSpztQGleII4oIyq/Sh6afFRjS3bWO4sy/aLFdwh485TKyJ+NU8/oHQdbKuUS
RgBLZCKx21RISAnB2+iigg80/L8O5X/vSc+TRYWeOd9q0riMtUyp4Y5ujT2+f3sb
WXFuApcORWdvrvTtEnqbfv0fh2PNQCTvBWLrqWLgEsw5/ItcXFWfXMURL/6aTe1Q
uIy5YCZaLLGC+gZyLNHirTHoMHW4Sjk/K6qhr88TvD9cePvL3v5b7w==
-----END RSA PRIVATE KEY-----

A quick glance at the Proc-Type field shows that this key is passphrase-protected. The DEK-Info contains the cipher info which will be used to decrypt this key.

Note: In case we had not used the des3 option, Proc-Type and DEK-Info would have been missing.

Step 2 – Decrypting the private key

Now, we try to access this passphrase-protected private key using the openssl rsa command-line utility. For this, use the below command.

openssl rsa -in mykey.pem

If your private key is passphrase-protected (as is in our case), it will ask you for the passphrase. If you enter the correct one which was used to encrypt this private key, you will get the decrypted private key, otherwise you will get an error. Below is the decrypted key we get upon entering the correct passphrase.

-----BEGIN RSA PRIVATE KEY-----
MIIBPAIBAAJBANhyaRIelfag0zHYkexRA5gTephO+N3MvX4ijkhCVhTLE1qPKkRa
Z7u6Q6AA9Xria8w5Sf1nDewHeqwf9d9MjzcCAwEAAQJBAL+Kn8jVIEickcjuqlPC
bbfKpRbb7Af8A0T4N4liiuLiIpZdC6vkdUvEEmz64zxX02v0J4UOCWcnDzOpI1ux
OoECIQDvAzVjQjawZN2QbD7hLa8wIB4kMSw8fJrgUtuaw2DnhwIhAOfUn9i7MhDJ
HE5qNGLFG9tpHpxR3TXypPyuywaIAqbRAiAn2cIaBZ02teqXPOUTCFnwTTqZUDWO
9DuicU46NJ9AmwIhAKQMAlyUAlZ8aSpX3t/xiMfW99E34Kf3HqarbYEep3mxAiEA
reEYPggvKvpYT00tme4Mw71HvM5d1abiPThZyso7BPc=
-----END RSA PRIVATE KEY-----

And, voila, that is it! There you have your decrypted private key. 🙂

2FA and OTP

Traditionally, an SMS code served as the sufficient second step as part of two-factor authentication (2FA). However, owing to its numerous disadvantages, a shift is being made towards Time-based One Time Password (TOTP).

TOTP

A TOTP is a temporary passcode which is valid only for a certain amount of time. The two most common methods of generating a TOTP are via hardware tokens and software applications.

Hardware Token

A hardware token (such as RSA SecurID) is used to generate a TOTP, which is then used for authentication purposes. The hardware token keeps refreshing the OTP at a fixed time interval (usually 30 or 60 seconds) – thus, time-based. TOTP generation mainly requires the following:

  • A secret key.
  • Current time.
  • A hashing algorithm.

The secret key is combined with the current timestamp, and subsequently hashed using a predefined hashing function to generate the OTP (usually 6 or 8 digits).

When a user enters this OTP while logging in, the server asserts the validity of the same. The server maintains a copy of the secret key at its end.  To check the validity of the OTP, the server generates an OTP (using the same steps mentioned above) and compares the same against the user-provided OTP. This check will only be successful if the server and client used the same secret key, time and hashing algorithm while generating the OTP. Thus, it is essential that the hardware token’s clock is synchronized with the server clock.

Software Token

A software-based TOTP works similar to a hardware token TOTP. The most common software token in current use is the Google Authenticator.

The secret key needs to be provided to this app before TOTP generation can begin. This is either done by manually entering the key or, by scanning a QR code containing the same.

Once set up, the app works similar to a hardware token, i.e., it hashes the combination of the secret key and the current time to generate a TOTP.

Bonus: QR code generation

To generate a QR code compatible with Google Authenticator, generate a URI string in the format supported by the app and create a QR code for the same. Example URI string:

otpauth://totp/Rudra%20Nirvan:rudra@rudranirvan.com?secret=5SJOJCK2ACHP36VPON5MCUWLQ4LDGI5B&issuer=Rudra%20Nirvan&algorithm=SHA1&digits=6&period=30

This string defines the secret key, the hashing algorithm (SHA1), OTP validity and a few more details.

Now go to any QR code generation website and generate a QR code against the above URI. Finally, scan the QR code using your Google Authenticator app. That’s it. You will now notice OTP being generated in your app!

/etc/resolv.conf and /etc/hosts

How do I resolve subdomain to subdomain.domain.com?

In Unix-like systems, if you open your /etc/resolv.conf file, you will notice that it contains a list of the nameservers to be used for address resolution. It might also, optionally, contain one of two fields: search or domain.

domain

A domain entry could be of the following form:

domain domain.com

This tells the domain name resolver to append domain.com at the end of names which do not end in a . (dot).

search

A search entry could be of the following form:

search domain.com alternativedomain.com

This tells the resolver to first append domain.com for name resolution. If that fails, the resolver moves on to the next search domain (alternativedomain.com), and so on.

NOTE: If both domain and search are used, the one that appears last will be used.

Modifying resolv.conf

If you were to modify the resolv.conf file directly, for domain/search editing, it would be over-written by the OS, due to various reasons (DHCP being the most common). Depending on you OS, there are various utilities available to modify these settings. Go, explore the world wide web!

How to check if your modification works?

You could verify your changes by running the host utility. Your changes would not be reflected if you were to use dig. To make dig work, you could use the +search option. For e.g., dig +search domain.

Creating DNS like entries on your local

Your /etc/hosts could contain an entry like the following:

216.58.220.46 www.google.com

As is apparent from the above line, google.com would be resolved to 216.58.220.46.

How to check if your modification works?

Running the dig or host utility would not work for the /etc/hosts changes. dig and host are meant for DNS lookups, not file lookups. These two utilities do not make use of the gethostbyname system call (which internally checks the /etc/hosts file), which is used by most programs. If you were to open the domain in your web browser, your request should be made to the correct IP address (from the hosts file).

How Spring’s XML config works?

Ever wondered how an XML based Spring configuration gets converted to Spring beans? The underlying principle is quite easy to grasp. Simply, parse the given XML document and keep creating the appropriate beans along the way.

Sample XML config

<?xml version="1.0" encoding="UTF-8"?>
<beans xmlns="http://www.springframework.org/schema/beans"
   xmlns:xsi="http://www.w3.org/2001/XMLSchema-instance" 
   xmlns:jms="http://www.springframework.org/schema/jms"
   xmlns:context="http://www.springframework.org/schema/context"
   xsi:schemaLocation="http://www.springframework.org/schema/beans
   http://www.springframework.org/schema/beans/spring-beans.xsd 
   http://www.springframework.org/schema/jms 
   http://www.springframework.org/schema/jms/spring-jms.xsd
   http://www.springframework.org/schema/context 
   http://www.springframework.org/schema/context/spring-context.xsd">

   <context:annotation-config />

   <jms:listener-container connection-factory="random">
      <jms:listener ref="randomKlass" method="randomMethod" />
   </jms:listener-container>
   
   <bean id="randomKlass" class="com.rudranirvan.RandomKlass">
      <property name="randomName" value="randomValue" />
   </bean>
</beans>

Prerequisites

XSD

XSD (Xml Schema Definition) defines how an XML document is structured. One needs to adhere to this structure when creating an XML for the same. Why? Because the same XSD will be referred to by Spring while parsing the XML.

XSDs are pretty much self-explanatory. You can read the spring-beans xsd declared in the above XML here.

XML Namespace

Namespaces are no-frills conflict-avoidance mechanisms. How will you differentiate between a <body> tag of one XSD from the <body> tag of another XSD?

Simple, just namespace the tags!  <ns1:body> vs <ns2:body>ns1 and ns2 just denote two namespace prefixes.

In the above XML, the annotation-config element uses the context namespace prefix. listener-container uses the jms namespace prefix.

XML Namespace Prefix

xmlns attribute is used to define XML namespaces. Namespace prefixes provide an easy to use replacement for namespaces. For e.g., in the above XML, xmlns:jms=”http://www.springframework.org/schema/jms denotes that the jms prefix will point to the http://www.springframework.org/schema/jms namespace.

The <bean> element belongs to the default namespace of the document, http://www.springframework.org/schema/beans. This default namespace is defined by xmlns=”http://www.springframework.org/schema/beans.

Part 1: Resolving the XSD files

Resolution of XSDs is a very simple step. The location where the XSDs are present is already provided in the XML document by the xsi:schemaLocation attribute. schemaLocation can have multiple entries. Each will be in the following format: “namespace namespace-schema-URL“. Example from the above XML:

http://www.springframework.org/schema/context http://www.springframework.org/schema/beans/spring-context.xsd

This tells you that the XSD for the http://www.springframework.org/schema/context schema is located at the following URI: http://www.springframework.org/schema/beans/spring-context.xsd.

Although this points to a remote HTTP resource, this spring-context XSD is not fetched from the internet! PluggableSchemaResolver helps Spring load these XSDs without accessing to the internet.

How does PluggableSchemaResolver work?

If you look at its source code, you will realize that it picks up all the META-INF/spring.schemas files from the classpath. These files are already shipped along with the appropriate spring JARs and contain the schemas’ remote URI to classpath URI mapping.

Example: The spring-context jar contains the following line in its META-INF/spring.schemas file:

http\://www.springframework.org/schema/context/spring-context.xsd=org/springframework/context/config/spring-context-4.1.xsd

It denotes that the local classpath location of the XSD is classpath:org/springframework/context/config/spring-context-4.1.xsd. This mapping from remote resource to the local classpath resource will be stored by the PluggableSchemaResolver.

Part 2: Parsing the XML document

Spring uses DefaultBeanDefinitionDocumentReader to read the above XML document and, consequently, creates instances of BeanDefinition, aka, beans. (A BeanDefinition is just a programmatic description of a Spring bean.)

If you look at the source code of DefaultBeanDefinitionDocumentReader, you will notice that it already has the schema of spring-beans.xsd (the default context) hardcoded into it. However, when it encounters a custom namespaced element, for e.g., context, it will use the appropriate NamespaceHandler for parsing the same. The NamespaceHandler to be used will be decided by the DefaultNamespaceHandlerResolver. Brief summary of the steps taken by Spring to parse an XML document:

  • If the XML element belongs to the default namespace (refer XML Namespace Prefix above), DefaultBeanDefinitionDocumentReader parses, and creates the BeanDefinition for the same.
  • Otherwise, for custom namespace elements, the appropriate NamespaceHandler will be used.
  • Which NamespaceHandler to use is determined by DefaultNamespaceHandlerResolver.

How does DefaultNamespaceHandlerResolver work?

If you look at its source code, you will realize that it picks up all the META-INF/spring.handlers files from the classpath. These files are already shipped along with the appropriate spring JARs and contain the schema to handler mapping.

Example: The spring-context jar contains the following line in its META-INF/spring.handlers file:

http\://www.springframework.org/schema/context=org.springframework.context.config.ContextNamespaceHandler

This signifies that all the elements belonging to the http://www.springframework.org/schema/context schema will be handled by org.springframework.context.config.ContextNamespaceHandler. This mapping from namespace to NamespaceHandler will be stored by the DefaultNamespaceHandlerResolver. The same will be returned when requested by the DefaultBeanDefinitionDocumentReader.

Part 3: How are custom namespace elements converted to beans?

As we saw above, the parsing of custom namespace elements, for e.g., <context:annotation-config> or <jms:listener-container> will be handled by the appropriate NamespaceHandler. The handler in turn delegates the parsing to a BeanDefinitionParser for further processing.

Example 1: ContextNamespaceHandler will delegate the parsing job for annotation-config (context:annotation-config) to AnnotationConfigBeanDefinitionParser (click to see why).

Example 2: JmsNamespaceHandler will delegate the parsing job for listener-container (jms:listener-container) to JmsListenerContainerParser (click to see why).

Sample scenario: JmsListenerContainerParser in action

The <jms:listener-container> element will cause a JmsListenerContainerFactory to be set up. But which exact implementation to use? In our sample XML, a DefaultJmsListenerContainerFactory will be set up. Why? Because the attribute container-type (of the element listener-container) has a value of default. Refer this for the internals.

But did you notice that we have not even defined this attribute in our sample XML? Then where is it getting this value from? From the XSD! If you were to look at the spring-jms XSD, you would notice that the default value for the attribute container-type is default!

Epilogue

Remote schema XSDs are picked up from the local classpath by using the mapping defined in META-INF/spring.schemas. Custom (non-default) namespaces are handled by the appropriate NamespaceHandler. Which NamespaceHandler to use will be defined in the META-INF/spring.handlers files. NamespaceHandler in turn uses a BeanDefinitionParser.

What can you deduce from the above? You can create your own custom namespaces! Explore more here. 🙂

Java using the command line

Introduction

With most Java programmers used to coding within the boundaries of an Integrated Development Environment (Eclipse, IntelliJ, etc.), when it comes to executing a simple Java code on a JVM, many falter. Below, we explore how to execute a simple Java program using the CLI.

The Java Code

Screen Shot 2017-01-08 at 3.15.21 AM.png

We have two classes – AwesomeClass and SuperAwesomeClass; and one resource file – app.config. Note that both the classes are in different packages.

AwesomeClass contains the main method. The main method expects a command line argument, and passes on the same to an instance of SuperAwesomeClass.

Finally, SuperAwesomeClass prints two lines, one containing the argument it received, and the second displays the contents of the app.config resource file.

Step 1 – Compilation

The first step to execute the above code would be compiling it, i.e., converting to Java bytecode. The bytecode can then be run on any JVM.

I have created a new folder in my Desktop (~/Desktop/project/) and copied both the source files (AwesomeClass.java and SuperAwesomeClass.java) into it. The resource file resides in the Desktop (~/Desktop/app.config).

Now, one possible way to generate the bytecode (.class files) is to do the following:

javac -d “.” -cp “/Users/rnirvan/.m2/repository/commons-io/commons-io/1.3.2/commons-io-1.3.2.jar” *.java

This command will result in the creation of two .class files. To understand how this happens, lets first understand this command. It consists of three parts:

-d "."

The d option signifies that the generated class files, AwesomeClass.class and SuperAwesomeClass.class (note: extension is .class and not .java), will be placed in the appropriate folder structure with respect to the current directory. The folder structure (which will be created by javac) is determined by the packaging of the Java files.

Therefore, for our two Java files, com.rudrnirvan.cli.package1.AwesomeClass.java and com.rudrnirvan.cli.package2.SuperAwesomeClass.java, two class files are generated: ./com/rudranirvan/cli/package1/AwesomeClass.class and ./com/rudranirvan/cli/package2/SuperAwesomeClass.class.

-cp "/Users/rnirvan/.m2/repository/commons-io/commons-io/1.3.2/commons-io-1.3.2.jar"

Using the cp option overrides the system classpath with provided one. We have provided the location of the commons-io jar. This is needed to support the org.apache.commons.io.IOUtils class needed by the SuperAwesomeClass(Try running this command without the “cp” option, and you will encounter a “missing symbol” error.)

*.java

This simply tells javac to compile all the files with a .java extension in the current directory. Consequently, AwesomeClass.java and SuperAwesomeClass.java will be compiled.

Step 2 – Execution

In this step, we will run the class files generated in the previous phase on the JVM. We can do this using the following:

java -cp “/Users/rnirvan/.m2/repository/commons-io/commons-io/1.3.2/commons-io-1.3.2.jar:/Users/rnirvan/Desktop/:.” com.rudranirvan.cli.package1.AwesomeClass 1234

This commands consists of the following three parts:

-cp "/Users/rnirvan/.m2/repository/commons-io/commons-io/1.3.2/commons-io-1.3.2.jar:/Users/rnirvan/Desktop/:."

Same as with the javac command, the cp option specifies the classpath to use. In unix-like systems, multiple classpath entries are separated by a colon. In Windows, the separator is a semi-colon.

Our classpath consists of three entries:

  • /Users/rnirvan/.m2/repository/commons-io/commons-io/1.3.2/commons-io-1.3.2.jar: As with the previous javac command, the jar entry is included to support the IOUtils class.
  • /Users/rnirvan/Desktop/: Included as this is where the resource file (app.config) is stored. ClassLoader.getResourceAsStream(String name) requires this file to be present in the classpath.
  • . (current directory): Inclusion of the current directory ensures that the two class files generated by the javac command get included in our classpath.
com.rudranirvan.cli.package1.AwesomeClass

This provides the class whose main method needs to be run. (If you provide a class with a missing “main” method, you will encounter a “could not load or find main class” error.)

1234

This is the command line argument which is passed to the main method.

Running this java command will provide an output similar to the following:

1234
I am the output from the app.config file.

Epilogue

At this point, it should now be clear why the classpath is so vital. You should hopefully be able to figure out how adding the commons-io jar to the classpath helps with the compilation process (hint: try listing the jar’s contents).

The method described here for executing Java files is just one of the multiple strategies you could apply. There is a lot of room to play around with just these two commands. Here is a fun exercise: try running javac without the option and try to figure out how you could then use the java command.

How NAT works

Your public IP

If you are connected to your home WiFi, try querying “my ip” on Google. This will show you something like this:

Screen Shot 2016-08-28 at 1.06.14 PM

As you can see, 106.51.24.219 is my public IP. Now, try the same Google search from another device (another laptop/smartphone) connected to the same WiFi. You will most likely get the same public IP.

Now, it is a well known fact that for computers to talk to each other over the internet, each computer needs to have a unique IP address. So, how does Google differentiate between your two devices when both are using the same IP?

IPv4

106.51.24.219 is what is know an an IPv4 address. It is a 32 bit address. Which translates to roughly over 4 billion available addresses. (Earth’s population is currently over 7 billion). Just 4 billion IPv4 addresses led to IPv4 exhaustion and forced people to adopt IPv6 (which has an excessively huge address space of 2128).

Network Address Translation

The exhaustion of IPv4 address space led to the widespread adoption of NAT. To keep things simple, I will only discuss the basic functionality of NAT, which is, mapping one address space into another.

Let’s digress a bit!

Your home router has multiple devices connected to it at the same time. Each of these devices (within your home LAN) has a unique IP address. These IPs, of your private network will be in one of the following formats:

  • 10.x.x.x
  • 192.168.x.x
  • 172.16.x.x – 172.31.x.x

Your router (also referred to as the Default Gateway) will also have a private IP address in one of the above formats. It will also have a public IP, which may or may not be in one of the above formats.

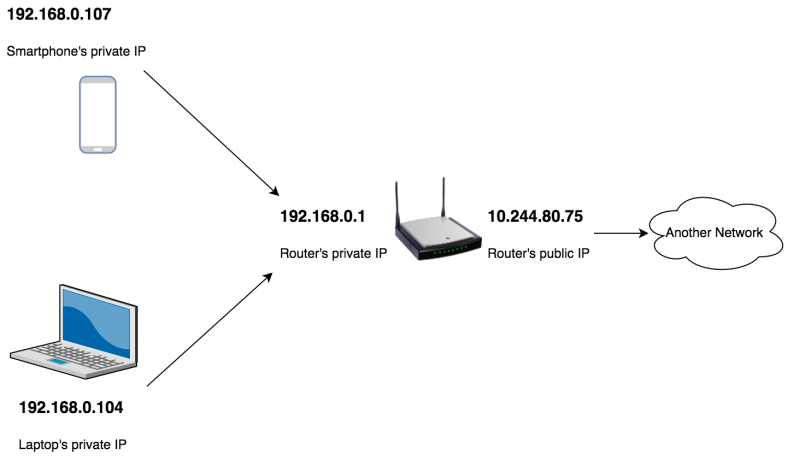
For e.g., my laptop’s private IP is 192.168.0.104 while my default gateway (router’s private IP) is 192.168.0.1(Use ipconfig on Windows and ifconfig on Unix-like to figure out yours.)

My router’s public IP is 10.244.80.75 (which you can figure out by accessing your router’s settings by connecting to the router’s private IP at port 80).

Pictorial depiction:

Screen Shot 2016-08-28 at 3.38.34 PM.png

Digressing just a bit more

A remote connection (socket) is always set up between a pair of host and port. For e.g., connecting to http://www.google.com from your machine requires the following two:

  • IP of http://www.google.com and the port to which to connect.
  • IP of the source (your machine) and the port.

When no port for the remote (google.com in this case) is specified, the default HTTP port 80 is used. So, hitting google.com from your browser will try to create a connection to 216.58.197.46:80 (google.com’s IP and port 80).

The source IP for my laptop will be 192.168.0.104. How do you specify the port you may ask? Well, it is taken care of by your OS. It will assign one of the ephemeral ports for the connection.

So, the connection might be established as follows:

192.168.0.104:65512 (my IP:port)-> 216.58.197.46:80 (google.com’s IP:port).

Back to NAT

Now, NAT does the translation from the local IP (192.168.0.104) to the public IP (router’s IP – 10.244.80.75). It converts the source IP:port from 192.168.0.104:65512 to 10.244.80.75:65470 (need not be 65470, could be anything). This conversion is done by modifying the source information in the IP packets.

Consequently, the connection to google.com will appear to be coming from 10.244.80.75:65470 instead of 192.168.0.104:65512.

Similarly, when I access google.com from my smartphone, the connection (to my phone) will appear to be as follows:

192.168.0.107:65216 (my IP:port)-> 216.58.197.46:80 (google.com’s IP:port).

However, NAT will map my local IP (and port) to the external facing IP (and port). Which might look like 10.244.80.75:62323.

NAT will maintain both these mappings (for my laptop and my phone) in the translation table:

  • 192.168.0.104:65512 -> 10.244.80.75:65470
  • 192.168.0.107:65216 -> 10.244.80.75:62323

What appears to google.com?

When google.com receives the two requests, they will appear to be originating from:

  • 10.244.80.75:65470
  • 10.244.80.75:62323

As you can see, searching for “my ip” on Google will result in Google returning to me the same public IP address (10.244.80.75) from two different machines.

How is the response returned to your device?

When Google returns its response to the two connections (same IP different ports), the request will reach your router. The router will then check the translation table and figure out the following mapping:

  • 10.244.80.75:65470 -> 192.168.0.104:65512
  • 10.244.80.75:62323 -> 192.168.0.107:65216

As you can see, the two responses will be returned to the appropriate device.

NAT behind another NAT

There is a fallacy in the above example. My router’s IP 10.244.80.75 belongs to the Class A private network address space. So, that is not what Google will be visible to Google. As you can see from the image at the very top, Google’s response was 106.51.24.219 and not 10.244.80.75.

Why is this happening? Because, there is in fact another layer of NAT (could actually be more than one). My ISP maintains its own LAN which has another gateway. Google might be receiving the IP of this gateway, and displaying the same to me in the result. Or, there could be a fourth gateway, and that is what Google is displaying!

Epilogue

We have seen how NAT helps abstract out a private network from the internet, by exposing a gateway. All the requests originating from this private network will appear to be coming from this gateway. What I did not mention is that this gateway could in fact hold a pool of external IPs. And it could assign any of these external facing IPs while performing the NAT translation. That is why, you will not see the same public IP (in Google) every time.

An interesting question arises out of this discussion. Why use NAT when you could very well just use a proxy server? Another blog?

Apache Maven (plugins, build lifecycles, phases and more)

Introduction

Apache Maven is a tool, primarily used for Java, to help solve two problems:

  • Describe the software build process (compiling, testing, packaging, etc.).
  • Manage the various dependencies (JAR libraries) associated with a project.

Build Process

At the core of Maven are the various plugins which help with the build process. Each plugin will have one or more goals associated with it.

The build process is nothing but a sequential execution of several plugins (and the associated goals).

Plugins

The following examples of some of the popular plugins should make the concept of plugins and goals clear.

maven-compiler-plugin

As was mentioned earlier, to execute a plugin, one of its associated goals must be specified. The maven-compiler-plugin supports two goals. The first goal (namely, compile) is executed in the following way:

mvn compiler:compile

This will compile the main source code of your project (“src/main/java”) and place the compiled classes under the “target/classes” folder. You can change this default behaviour, but why would you? After all, Maven follows the philosophy of convention over configuration!

The second goal (namely, testCompile) is executed in the following way:

mvn compiler:testCompile

This will compile the test source code of your project (“src/test/java”) and place the compiled classes under the “target/test-classes”.

maven-surefire-plugin

This plugin has only one goal which is executed as follows:

mvn surefire:test

This will run the unit tests of your project, print the test result to the console and store a generated test report under “target/surefire-reports”.

Combining plugin goals

As can be seen above, a plugin (with a goal) can be run on a project to do some predefined job. Now, multiple plugins can be executed sequentially to create a build process. However, Maven allows one nifty feature, whereby multiple plugin goals can be executed using just one command.

mvn compiler:compile compiler:testCompile surefire:test

The above command will perform three operations:

  • Compile the main source code.
  • Compile the test source code.
  • Run unit tests and generate a report.

How to manage executing multiple plugins?

As the number of plugin goals which need to be executed grows, so grows the chances of an error creeping into a long terminal command. If you look at the build process for different projects, it turns out, this process usually follows a pattern (for e.g., compilation, followed by unit testing, followed by packaging, etc.).

To streamline (and standardize) this build process, Maven provides the concept of build lifecycle.

Build Lifecycle

Out of the box, Maven provides us with three build lifecycles: clean, default and site.

Each lifecycle is made up of a number of phases, and each phase can execute zero or more plugin goals.

We will concentrate on the two first two lifecycles: default lifecycle and clean lifecycle.

Default lifecycle

The default lifecycle has 23 phases associated with it. Each of these 23 phases can execute zero or multiple goals. These phases are executed sequentially, in a predefined order. Execution of a phase refers to execution of the plugin goals associated with it. 

Some of the important phases (in the order they are executed) are:

  • process-resources: Copies the main resources into the main output directory.
  • compile: Compilation of main source code.
  • process-test-resources: Copies the test resources into the test output directory.
  • test-compile: Compilation of test source code.
  • package: Package the compiled code into a distributable format (JAR, WAR, etc.).
  • install: Install the package into your local M2 (maven repo).
  • deploy: Copies the package to the remote repo.

The complete list of the 23 phases can be found here.

When you execute a phase of the default lifecycle, all the phases above it are also executed. For e.g., to execute the install phase, and all the phases above it, simply run the following command:

mvn install

Maven, out of the box, binds some of these 23 phases to some plugin goals. So, when you execute mvn install (without associating any custom goal to any phase), the default phase goals are executed. These default goals are determined by the type of project packaging. For e.g., for the packaging type JAR these are the default bindings.

Clean Lifecycle

The clean lifecycle has only three phases: pre-clean, clean and post-clean.

The most important of these, clean, is executed as follows:

mvn clean

This phase has the maven-clean-plugin‘s clean goal associated with it. This goal clears the contents of the “target/” folder.

Combining Lifecycles

Lifecycles can be combined in the following manner:

mvn clean install

This command results in the following:

  • The clean phase of the clean lifecyle is executed. Which in turn executes the clean goal of the maven-clean-plugin.
  • The install phase of the default lifecycle is executed. Which results in 22 phases being executed (deploy phase is not executed since it comes after install in the execution hierarchy).

Epilogue

The build process of Maven is simply the execution of multiple plugin goals. To make this build process easier for developers, Maven provides the concept of lifecycles. Each lifecycle is a combination of multiple phases, and each phase can have multiple plugin goals associated with it.

This post turned out to be a bit longer than I expected. So, not going to dig deeper into the dependency management functionality of Maven. Also, I could not cover how plugin goals can be bound to lifecycle phases. I might cover these topics in a future post. Till then, you can play around with the various plugins offered by Maven. Cheers!

Digital Certificates: TLS and more

Introduction

A digital certificate serves a very simple purpose. Its job is to certify the ownership of a public key. This gives the user of the certificate the confidence that the public key has not been tampered with. Certificates are issued by a Certificate Authority (CA).

Certificates find many uses. They are crucial to the whole concept of TLS. It is used to both, encrypt a message and authenticate a message. Another area of use is email encryption.

How does a certificate look like?

Certificates usually conform to the X.509 structure. Here is a sample certificate picked up from Wikipedia:

Certificate:
   Data:
       Version: 1 (0x0)
       Serial Number: 7829 (0x1e95)
       Signature Algorithm: md5WithRSAEncryption
       Issuer: C=ZA, ST=Western Cape, L=Cape Town, O=Thawte Consulting cc,
               OU=Certification Services Division,
               CN=Thawte Server CA/emailAddress=server-certs@thawte.com
       Validity
           Not Before: Jul  9 16:04:02 1998 GMT
           Not After : Jul  9 16:04:02 1999 GMT
       Subject: C=US, ST=Maryland, L=Pasadena, O=Brent Baccala,
                OU=FreeSoft, CN=www.freesoft.org/emailAddress=baccala@freesoft.org
       Subject Public Key Info:
           Public Key Algorithm: rsaEncryption
           RSA Public Key: (1024 bit)
               Modulus (1024 bit):
                   00:b4:31:98:0a:c4:bc:62:c1:88:aa:dc:b0:c8:bb:
                   33:35:19:d5:0c:64:b9:3d:41:b2:96:fc:f3:31:e1:
                   66:36:d0:8e:56:12:44:ba:75:eb:e8:1c:9c:5b:66:
                   70:33:52:14:c9:ec:4f:91:51:70:39:de:53:85:17:
                   16:94:6e:ee:f4:d5:6f:d5:ca:b3:47:5e:1b:0c:7b:
                   c5:cc:2b:6b:c1:90:c3:16:31:0d:bf:7a:c7:47:77:
                   8f:a0:21:c7:4c:d0:16:65:00:c1:0f:d7:b8:80:e3:
                   d2:75:6b:c1:ea:9e:5c:5c:ea:7d:c1:a1:10:bc:b8:
                   e8:35:1c:9e:27:52:7e:41:8f
               Exponent: 65537 (0x10001)
   Signature Algorithm: md5WithRSAEncryption
       93:5f:8f:5f:c5:af:bf:0a:ab:a5:6d:fb:24:5f:b6:59:5d:9d:
       92:2e:4a:1b:8b:ac:7d:99:17:5d:cd:19:f6:ad:ef:63:2f:92:
       ab:2f:4b:cf:0a:13:90:ee:2c:0e:43:03:be:f6:ea:8e:9c:67:
       d0:a2:40:03:f7:ef:6a:15:09:79:a9:46:ed:b7:16:1b:41:72:
       0d:19:aa:ad:dd:9a:df:ab:97:50:65:f5:5e:85:a6:ef:19:d1:
       5a:de:9d:ea:63:cd:cb:cc:6d:5d:01:85:b5:6d:c8:f3:d9:f7:
       8f:0e:fc:ba:1f:34:e9:96:6e:6c:cf:f2:ef:9b:bf:de:b5:22:
       68:9f

When you open a website (using HTTPS), your browser gets a similar certificate from the server (the website).

The first check the browser does is regarding the validity of the certificate (the Not Before and the Not After part). If the current time does not fall between these two timestamps, your browser will crib.

The second check is for the Common Name (CN). It is the FQDN of the owner of the certificate. If the website you are accessing does not match this CN (“www.freesoft.org” in this case), your browser will crib.

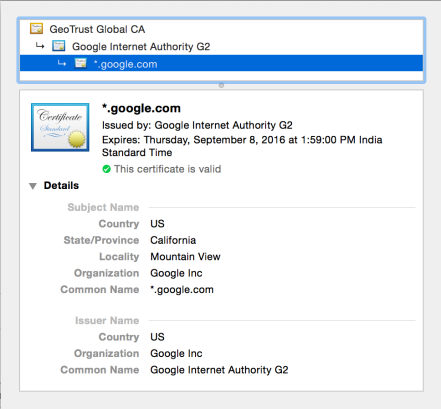
Note: If you want the same certificate to support multiple domains, you can use wildcards. Here is an example of Google’s certificate supporting wildcard (it will apply to “anything.google.com”):

Screen Shot 2016-06-29 at 7.28.00 PM

Why would you (your browser) trust this certificate?

Because it has been signed by another CA! We will come to why you’ll trust this CA later, but for now let’s assume that you do trust this second CA. This CA will have its own certificate which we will be using to the validate the first certificate. This secon certificate will also look similar to the one shown at the top.

Let’s authenticate this certificate!

Now comes the fun stuff. Our job is to verify only one thing – that the signature (mentioned at the bottom of the certificate) is actually genuine. Let’s verify this!

In the first certificate, the Signature Algorithm is mentioned as md5WithRSAEncryption. This signifies that the second CA took the MD5 hash of the first certificate, and encrypted it using RSA (which is an asymmetric algorithm). The encryption was done using their (the second CA’s) private key. The result of this MD5 followed by RSA is what is called the certificate’s signature (which, again, you can see at the bottom of the certificate).

Now, all your browser needs to do is, decrypt the signature (using the second CA’s public key from their certificate), extract the MD5 hash of the (first) certificate from it and finally match this hash with an independently computed MD5 hash of the (first) certificate.

If the hashes match, it proves that the certificate has not been tampered with. Or, in other words, it has been properly signed! Hence, I mentioned in the beginning that our only job is to prove the authenticity of this signature (since it implicitly guarantees that the certificate has not been, maliciously or otherwise, modified).

Easy, wasn’t it? 🙂

Chain of Trust

Now, let’s revisit our question – why would you trust the second CA? It all about the chain of trust.

It’s quite simple actually. You blindly trust the certificate you receive (from the website), verify its authenticity (signature) using the issuer’s (second CA’s) certificate. Now, you need to verify the authenticity of the second CA. For that, you fetch its issuer’s (third CA’s) certificate, and authenticate. This chain goes on all the way to the top CA. The top CA’s certificate is called Root Certificate.

Now, imagine, that you trust the root CA’s certificate. This implicitly authenticates the certificates of all the CA’s in the chain of trust, doesn’t it? This leads us to (the final) question.

Why trust the Root Certificate?

In the second image (Google’s partial certificate), you can see the chain of trust. At the root is the GeoTrust Global CA. Your browser blindly trusts this CA’s certificate. This is because root level certificates are already part of you browser/OS they are shipped!

Epilogue

Just one line here: certificates provide (among other things) a very simple mechanism to authenticate someone’s public key.

Why do you need to authenticate someone’s public key? Read the “Why would you trust my public key?” part in my previous blog.